toolbox

CSS only slide out menu

Neat trick to toggle the display of something in the page, using only CSS. In this case, a slide out menu.

First we need the HTML:

<input id="menu-toggle" type="checkbox">
<label class="menu-trigger" for="menu-toggle"></label>
<nav id="menu">
  <ul>
    <li>
      <a href="">Menu Item</a>
    </li>
  </ul>
</nav>

Use the “:checked” pseudo-class, to check the state of the menu (open/close).
Hide the checkbox input, as it is not vissually needed, and style the label as a menu button.

#menu {
  width: 100%;
  position: fixed;
  right: -100%; /* move the menu out of the screen */
  top: 0;
  bottom: 0;
  overflow-y: auto;
  transition: all 1s cubic-bezier(0.2, 1, 0.2, 1) 0s;
  z-index: 999;
}

#menu-toggle {
  position: absolute;
  left: 0;
  top: 0;
  opacity: 0;
  visibility: hidden;
}

#menu-toggle:checked ~ #menu {
  right: 0; /* add the menu into the screen */
}

.menu-trigger {
  /* Closed menu style ☰ */
}

#menu-toggle:checked ~ .menu-trigger {
  /* Opened menu style × */
}

Simple HTML5 placeholders fallback for IE9 and older

I hoped I will never hear about IE9 and its lack of support for the placeholder attribute, … I had high hopes.

I’ve boiled a simple fallback, late in the evening and in a rush, using IE conditional comments for browser detection.

<!--[if IE 8 ]>    <html class="ie8 lt-ie10"> <![endif]-->
<!--[if IE 9 ]>    <html class="ie9 lt-ie10"> <![endif]-->
<!--[if (gt IE 9)|!(IE)]><!--> <html><!--<![endif]-->
$(document).ready(function() {

	// HTML5 placeholders fallback for IE9 and older
	if ($('html').hasClass('lt-ie10')) {

		// add the placeholder text as value
		$('textarea, input:text').each(function() {
			$(this).attr('value', $(this).attr('placeholder'));
		});

		// clear form fields on focus
		$('textarea, input:text').on('focus click', function(){
			if (this.value == this.defaultValue) {
			this.value = '';
			}
		}).on('blur', function(){
			if (this.value == '') {
			this.value = this.defaultValue;
			}
		});
	}

});

Network cable tester

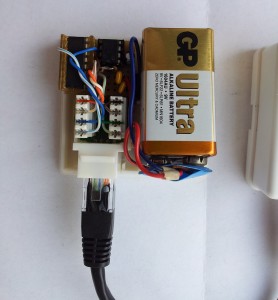
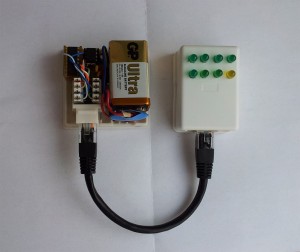
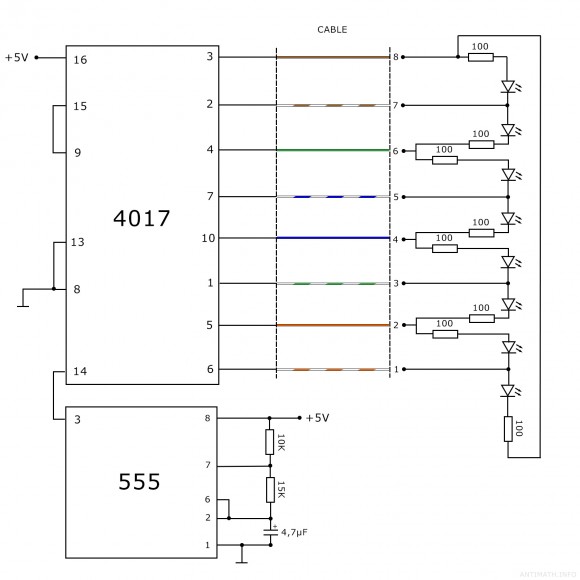
Build a network cable tester with just two cheap integrated circuits and a few parts from the ‘junkbox’.
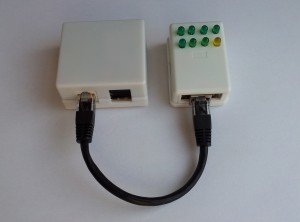
This cable tester, tests all the 8 wires in a network cable in one move, if one of the 8 LEDs does not lit up, it means that the wire corresponding to that LED is faulty.

You need:

  • 1 x 4017 decade counter,
  • 1 x 555 timer,
  • 8 x LEDs,
  • 2 x 8P8C modular connector (RJ45),
  • 8 x 100Ω resistor,
  • 1 x 10KΩ resistor,
  • 1 x 15KΩ resistor,
  • 1 x 4,7µF capacitor.

network-tester

The yellow LED has no special significance, I only had 7 green LEDs.

A good ideea would be that every LED have the color of the corresponding wire, and maybe a switch for the T568A and T568B standards.

Prevent inner elements trigger an event on the parent

Method 1
Stop propagation on inner elements before attaching an event on the parent.

$('#parent a').on('click', function(event){
  //stop the event bubbling up to the parent
  event.stopPropagation();
});

$('#parent').on('click', function(event){
  //attach event on the parent
  alert('Parent element clicked!');	
});

Method 2
Check if the event target matches the designated target.

$('#parent').on('click', function(event) {
  if(event.target == event.currentTarget) {
    alert('Parent element clicked!');
  } else {
    alert('Child element clicked!');
  }
});

Method 2.1
Check if the tag name of the event target matches a certain element.

$('#parent').on('click', function(event){
  if(event.target.tagName.toLowerCase() === 'a'){
    alert('Child anchor element clicked!');
  } else {
    alert('Parent element clicked!');
  }
});

Hide popup when clicking outside

//show popup when clicking the trigger
$('#trigger').on('click touch', function(){
  $('#tooltip').show();
});			

//hide it when clicking anywhere else except the popup and the trigger
$(document).on('click touch', function(event) {
  if (!$(event.target).parents().addBack().is('#trigger')) {
    $('#tooltip').hide();
  }
});

// Stop propagation to prevent hiding "#tooltip" when clicking on it
$('#tooltip').on('click touch', function(event) {
  event.stopPropagation();
});

Demo

WordPress shortcodes for attachments

A nice cool way to organize the attachments from a post or page, and not having to deal with ugly html in the wysiwyg editor, is using shortcodes. Just add the code below into your theme functions.php.

// [attachments]
function attachmentUrl($atts) {
  extract(shortcode_atts(array(
      "src" => ''
  ), $atts));
  /* $filename_match = preg_match("/([a-zA-Z0-9_\.\-]+\.[a-zA-Z]+)$/", $src, $filename); */
  $filename_match = preg_match("/\/([^\/]*$)/", $src, $filename);
  return '<div class="attachments"><h4>Attachments</h4><ul class="attachments_list attachment"><li><a href="'.$src.'" target="_blank">'.$filename[1].'</a></li></ul></div>';
}
add_shortcode("attachment", "attachmentUrl");

// Audio shortcode
function audioURL($atts) {
  extract(shortcode_atts(array(
      "src" => ''
  ), $atts));
  return '<audio src="'.$src.'" type="audio/mp3" controls="controls"></audio>';
}
add_shortcode("audio", "audioURL");

// Video shortcode
function videoURL($atts) {
  extract(shortcode_atts(array(
      "src" => ''
  ), $atts));
  return '<video controls="controls" preload="none"><source src="'.$src.'" type="video/mp4" /></video>';
}
add_shortcode("video", "videoURL");

// Customize the 'insert into Post' action

add_filter('media_send_to_editor', 'my_filter_iste', 20, 3);

function my_filter_iste($html, $id, $caption, $title, $align, $url, $size, $alt) {
    $attachment = get_post($id); //fetching attachment by $id passed through
    $src = wp_get_attachment_url( $id );
    $videoext = '.mp4';
    $audioext = '.mp3';

    $mime_type = $attachment->post_mime_type; //getting the mime-type

    if ((substr($mime_type, 0, 5) == 'video') || (substr_compare($src, $videoext, strlen($str)-strlen($videoext), strlen($videoext)) === 0)) { //checking mime-type
        $html = '[video src="'.$src.'"]';
    } elseif ((substr($mime_type, 0, 5) == 'audio') || (substr_compare($src, $audioext, strlen($str)-strlen($audioext), strlen($audioext)) === 0)) { //checking mime-type
        $html = '[audio src="'.$src.'"]';
    } else {
      $html = '[attachment src="'.$src.'"]';
    }
    return $html; // return new $html
}

and the ‘insert into post’ action will insert a shortcode similar to [attachment src=”URL_to_attachment”] , that returns in frontend the HTML that corresponds to the uploaded file mime type.
How to test an optocoupler

An optocoupler or optoisolator, is a device that contains a light-emitting diode (LED) and a photosensor ( photodetector, such as a photoresistor, a photodiode, a phototransistor, …etc ). The purpose of an optocoupler is to transfer signals from one circuit to another yet keep them galvanically isolated.

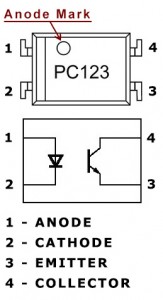
Here I want to show you how to check if an optocoupler is working. So I’ve chosen one of the most commonly used optocouplers ( PC123 – 4 pins) for the demonstration, but you can use the same principle for all optocouplers ( note: check the datasheet first ).

Step 1pc123

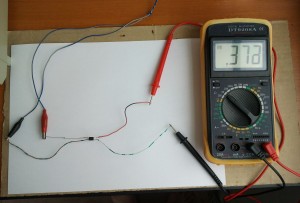
Using the diagram in the right identify the pins; first the anode and cathode of the LED ( in this case pins 1 and 2 ), and then using an ohmmeter set on the ‘X1 Ohm’ domain, measure between pins 1 and 2, and you should get one reading measuring one way and no reading the opposite way (just like you check a diode). If you get a value either way or no value at all, then certainly there is a problem with the LED, and you should find another optocoupler.

Step 2

If the LED is good then we should check the phototransistor, you could measure it with the ohmmeter just like the LED between pins 3 and 4 ( the emitter and collector ), and you should get a high resistance value both ways if the phototransistor is good. If you’ll get no reading at all, is probably because most phototransistors have such high resistance between emitter and collector that the ohmmeter can’t measure; if this is the case you could connect two ohmmeters in series thus increasing the measuring domain; …although i think most don’t have two meters so i recommend the ’empirical’ method, presuming you have a variable DC regulated power supply.

“Empirical” methodOptocoupler test

Connect the ohmmeter ( X1K Ohm or  X10K Ohm ) between emitter and collector ( 3 and 4 ) like this: red probe to collector and black probe to emitter. Now connect a resistor of a few hundred ohms ( ~300 ohms ) in series with the LED anode, after this turn on the power supply and start increasing the voltage from 0 to 2…3 volts, and you should be able to see on the ohmmeter how the output resistance decreases as the input voltage increases and viceversa.

Clear form fields on focus

If you want to make a form without labels for text inputs or textareas, and instead give the fields default values, you will encounter a little annoying  problem, when you focus the field to write something the default value stays there. To make the default value disappear you will need a few lines of javascript.

$('textarea, input:text').bind('focus click', function(){
		if (this.value == this.defaultValue) {
		this.value = '';
		}
	}).bind('blur', function(){
		if (this.value == '') {
		this.value = this.defaultValue;
		}
	});

Note that this script uses jQuery so in order to work you’ll need to have jQuery installed.

To make all clear here is a demo.

CSS fixed background

Sometimes you will need to make a background image fixed ( not to scroll with the page ), that because you have a very large image that does not repeat, or you want to make something like an watermark, the solution is simple and is around for ages, all you have to do is use the CSS background-attachment property.

Background-attachment supports three values: scroll ( which is default ), fixed and inherit.

In most cases the fixed background is applied to the body element, but can be applied to any HTML element. Without further ado, … the CSS code.

body {
      background-image: url('path/to/background.jpg');
      background-repeat: no-repeat;
      background-attachment: fixed;
      background-position: center;
}

Below is the shorthand version .


body {
      background: url('path/to/background.jpg') no-repeat fixed center;
}

Here you have a demo.