Prevent inner elements trigger an event on the parent

Method 1
Stop propagation on inner elements before attaching an event on the parent.

$('#parent a').on('click', function(event){
  //stop the event bubbling up to the parent
  event.stopPropagation();
});

$('#parent').on('click', function(event){
  //attach event on the parent
  alert('Parent element clicked!');	
});

Method 2
Check if the event target matches the designated target.

$('#parent').on('click', function(event) {
  if(event.target == event.currentTarget) {
    alert('Parent element clicked!');
  } else {
    alert('Child element clicked!');
  }
});

Method 2.1
Check if the tag name of the event target matches a certain element.

$('#parent').on('click', function(event){
  if(event.target.tagName.toLowerCase() === 'a'){
    alert('Child anchor element clicked!');
  } else {
    alert('Parent element clicked!');
  }
});

Hide popup when clicking outside

//show popup when clicking the trigger
$('#trigger').on('click touch', function(){
  $('#tooltip').show();
});			

//hide it when clicking anywhere else except the popup and the trigger
$(document).on('click touch', function(event) {
  if (!$(event.target).parents().addBack().is('#trigger')) {
    $('#tooltip').hide();
  }
});

// Stop propagation to prevent hiding "#tooltip" when clicking on it
$('#tooltip').on('click touch', function(event) {
  event.stopPropagation();
});

Demo

4 bit relay computer

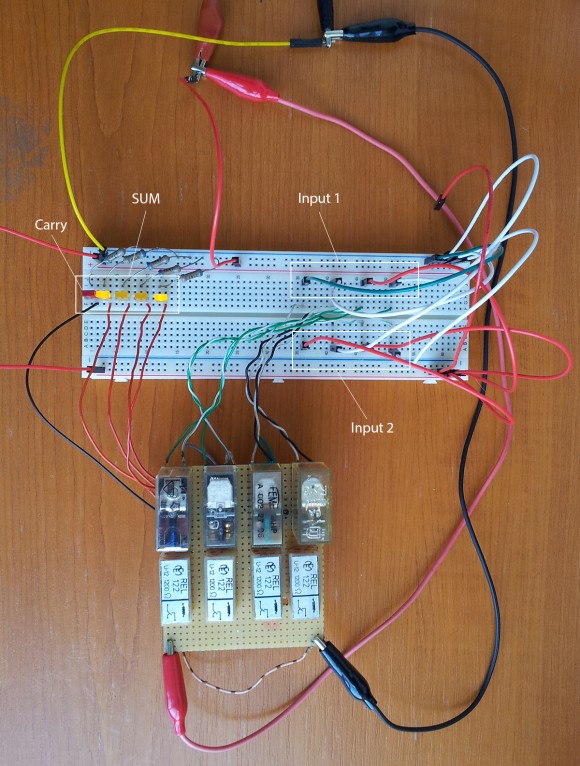
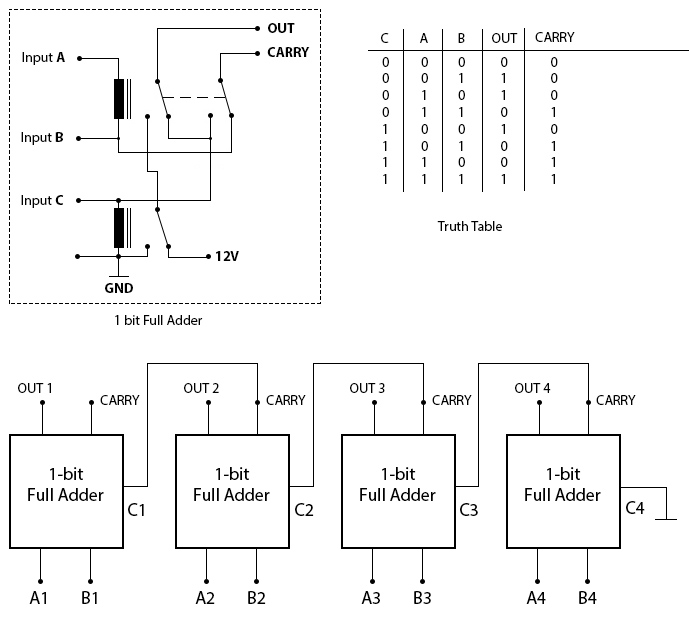
This is my first 4 bit adder built with nothing more than relays.

4bit-adder-schematic

4bit-adder

The forest of wires on the right are used to set the input values (in the picture Input1 = 0100 (4 in base 10) and Input2 = 0101 (5 in base 10)), and the LEDs on the left are used as output indicators for the SUM (in this picture 1001 (9 in base 10)).

Prevent bxSlider stop auto

Prevent bxSlider stop auto slides transition, when navigating through slides.

$(document).ready(function(){
	var slider = $('#slideshow').bxSlider({
		auto: true,
		stopAuto: false,
		startSlide: 0
	});
	
	$(document).on('click','.bx-pager-link',function() {
	    slider.stopAuto();
	    slider.startAuto();
	});
});

Slide out hamburger menu

It is known that the slide out menus ( or hamburger menus ) are the best way of making a menu usable for mobile.

This method uses jQuery in order to clone the markup of the desktop version menu, and make it slide out. Check out the demo.

<body>
	<div id="container">
		<div id="header">
			<div id="navigation">
				<ul>
					<li>
						<a href="#">Lorem Ipsum</a>
					</li>
					<li>
						<a href="#">Lorem Ipsum</a>
					</li>
				</ul>
			</div>
			<span id="toggle-menu">Menu</span>
		</div>
	</div>
</body>
$('#navigation').clone().prependTo('body').addClass('mobile-navigation').removeAttr('id');
$('div.mobile-navigation').prepend('<span class="close">Close</span>');

$('#toggle-menu').bind('click touch', function(){
	if( $('div.mobile-navigation').hasClass('open') ){
		$('div.mobile-navigation').animate({width: "0px"}, 300).removeClass('open');
		$('#container').animate({left: "0px"}, 300);
	} else {
		$('div.mobile-navigation').animate({width: "210px"}, 300).addClass('open');
		$('#container').animate({left: "-210px"}, 300);
	}
});

$('div.mobile-navigation span.close').bind('click touch', function(){
	$('div.mobile-navigation').animate({width: "0px"}, 300).removeClass('open');
	$('#container').animate({left: "0px"}, 300);
});
#container {
  position: relative;
  width: 100%;
}

.mobile-navigation {
  width: 0;
  height: 100%;
  overflow: hidden;
  position: fixed;
  right: 0;
  top: 0;
  z-index: 200;
}

Check out demo.

Square wave generator with 7400 series chip

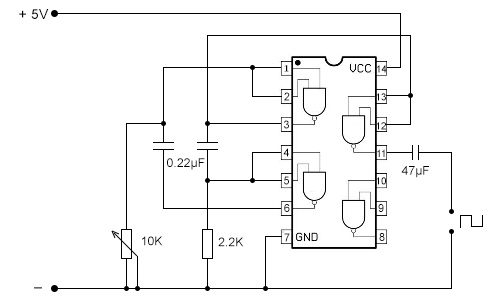
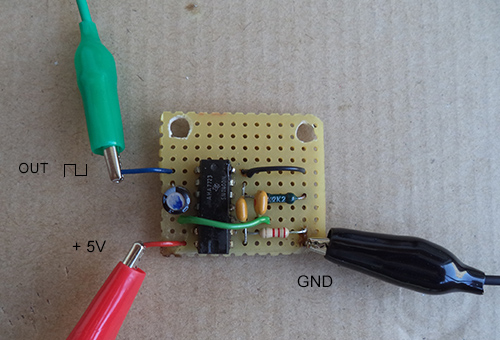
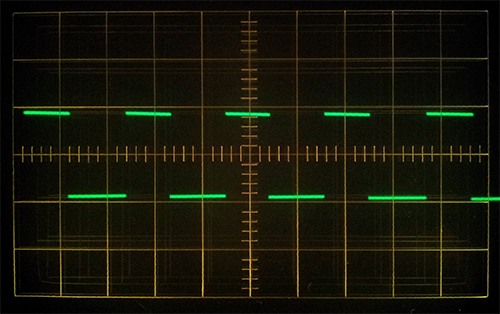
This is a simple and useful oscillator, built, using  just a 7400 chip ( 4 NAND gates ) and very few other components.

7400-square-wave
7400-square-wave-pcb
square-wave-signal

Rudimentary text expander

There are jQuery plugins, like TextExpander, which work well with portions of text wrapped inside a single element (like a ‘<p>’ tag), but when it comes to collapse block elements, the animation is not so smooth.

Here is a very rudimentary (but working) solution for truncating sections of text paragraphs and adding a ‘read more’ button.

<div class="expandable">
    <div class="inner">
        <p>Some text ...</p>
        <p>Some text ...</p>
    </div>
</div>
.expandable .inner {
    overflow: hidden;
}
$('div.expandable > div.inner').each(function(){
	var expadable_height = $(this).height();
	var visible_lines = 42; //the height of the minimum visible lines of text in px
	$(this).css('height', visible_lines); 
	$(this).parent('div.expandable').append('<span class="see-more">See More</span>');
	
	var toggle = 0;
	$(this).siblings('.see-more').click(function(){
		if( toggle == 1 ){
			$(this).siblings('div.inner').animate({height: visible_lines}, 500);
			$(this).text('See More');
			toggle = 0;
		} else {
			$(this).siblings('div.inner').animate({height: expadable_height}, 500);
			$(this).text('See Less');
			toggle = 1;
		}
	});
});

Demo

ECC83 tone generator

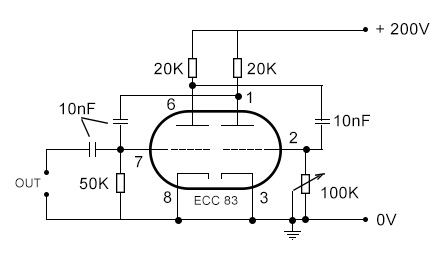
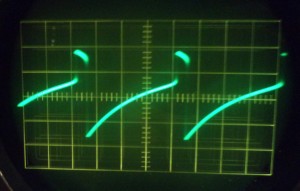
The circuit is basically a multivibrator constructed around a double triode ( I used ECC83 ), and oscillates around 1KHz.

ECC83 multivibrator

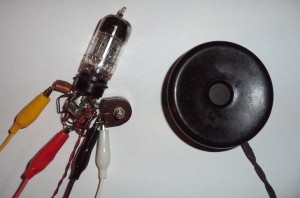
At the output I’ve connected a 2000 Ohm telephone loudspeaker, but with a transformer, a 4 Ohm speaker could be used as well.

The frequency can be adjusted from the 100K variable resistor.

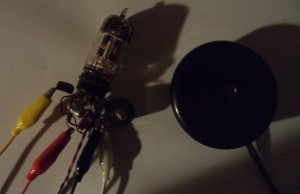
The ECC83 works well even at low voltage ( ~20V ).

ecc83-tone-genarator-circuitecc83-tone-genarator-circuit-darkwaveform

Check if page scroll is at bottom

May seem odd to check if the page scroll is at bottom, but can be useful if you need to hide something or show something else, as in a back to top button for example.

$('#back-to-top').hide();
$(window).scroll(function(){
    if ( document.body.scrollHeight - $(this).scrollTop()  <= $(this).height() ){
        $('#back-to-top').show();
    } else {
        $('#back-to-top').hide();
    }
});

Quick and simple jQuery accordion

A simple jQuery snippet for those times when you don’t need an entire plugin, but just something quick, and on the spot.

<ul class="accordion">
	<li>
		<div class="heading">Lorem ipsum dolor</div>
		<div class="content">
			Lorem ipsum dolor sit amet...
		</div>
	</li>
</ul>
//accordion
$('.accordion .content').hide();

$('.accordion .heading').click(function(){
	$(this).siblings('.content').slideToggle('fast');
	$(this).parent().toggleClass('active');
	$(this).parent().siblings().children('.content:visible').slideUp('fast');
	$(this).parent().siblings().children('.content:visible').parent().removeClass('active');
});

See demo here.

1bit half adder with one relay

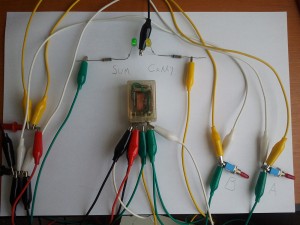
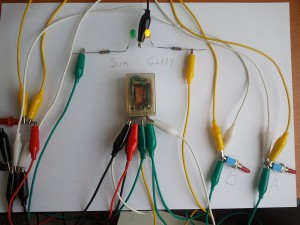
With just one double relay, you can make an adder capable of performing 1bit additions:

0 + 0 = 0
0 + 1 = 1
1 + 0 = 1
1 + 1 = 0 ( with Carry = 1 )

1bit-half-adder

The circuit design isn’t mine, I found it with a quick google search.

1bit-relay-adder-1
1bit-relay-adder-2

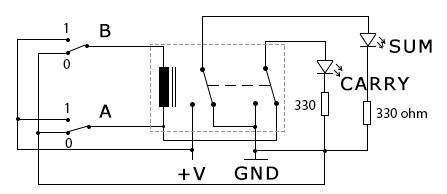
1bit-half-adder-full-detail

This is the complete schematic of the above circuit.

DIY high power USB car charger

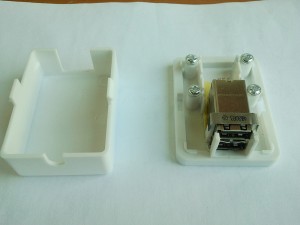
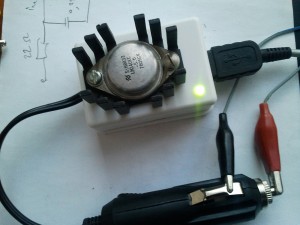
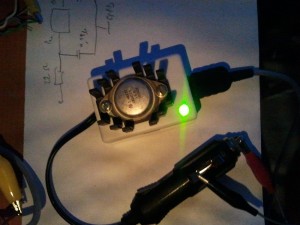
For some time I felt the need of an USB charger in my car, but all the commercial ones I’ve seen haven’t convinced me they are reliable. So I proposed myself to build one which would have to be “virtually indestructible”, stable and safe for the devices I connect to it.

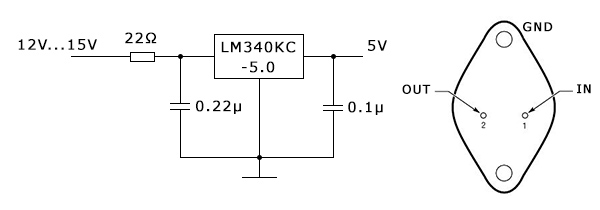
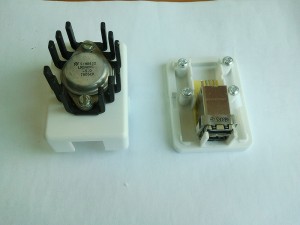
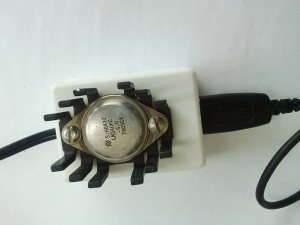
I remembered that I had a LM340KC-5.0 (5V positive regulator in TO-3 case), laying around somewhere, and told myself that this is perfect for the job. After I looked over the datasheet, I did a test circuit, and it performed perfectly.

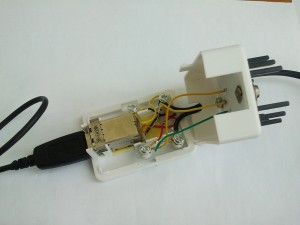
I bought a telephone outlet to use it as a case, and I mounted two USB receptacles (which I dismembered from an old computer motherboard) instead of the telephone jack, and the LM340 on top of the case.

The USB pins configuration you can find on Wikipedia.

I have also added a green LED to know if is working.

Have fun.

jQuery toggle functions

The toggle() method was deprecated in jQuery 1.8 and removed in 1.9.
In jQuery 1.9 the toggle() method does not toggle between two or more functions on a click event, it just toggles the visibility of an element.

Here is a quick way of replacing it:

var toggle = 0;
$('#toggle-btn').on('click', function(event) {
	event.preventDefault();
	if ( toggle == 1 ){
		// not clicked
		$(this).removeClass('clicked');
		toggle = 0;
	} else {
		// clicked
		$(this).addClass('clicked');
		toggle = 1;
	}
});

or just using a class,

$('#toggle-btn').on('click', function(event) {
	event.preventDefault();
	if ( $(this).hasClass('active') ) {
		$(this).removeClass('active');
	} else {
		$(this).addClass('active');
	}
});

See demo here.

BxSlider slides counter

Update! Scroll to updated code.

Add a slides counter ( current/total ) to bxSlider carousels, using bxSlider callbacks and methods.
You just have to add an html element ( ex. ‘<div id=”slide-counter”></div>’ ), where to show the numbers, and the code below will do the rest.

function insertCount(slide_curr,slide_count){
	$('#slide-counter').html('<strong>'+ (slide_curr + 1) +'</strong>/'+ slide_count);
};

var slider = $('#slideshow').bxSlider({
	auto: true,
	pager: false,
	onSliderLoad: function (){
		var slide_count = slider.getSlideCount();
		var slide_curr = slider.getCurrentSlide();
		insertCount(slide_curr,slide_count);
	},
	onSlideNext: function (){
		var slide_count = slider.getSlideCount();
		var slide_curr = slider.getCurrentSlide();
		insertCount(slide_curr,slide_count);
	},
	onSlidePrev: function (){
		var slide_count = slider.getSlideCount();
		var slide_curr = slider.getCurrentSlide();
		insertCount(slide_curr,slide_count);
	}
});

Because ‘onSlideNext’ and ‘onSlidePrev’ callbacks are executed only before each “Next” or “Prev” slide transition, if you want to use a ‘pager’ for navigating through slides, you’ll need to use the ‘onSlideAfter’ callback.

function insertCount(slide_curr,slide_count){
	$('#slide-counter').html('<strong>'+ (slide_curr + 1) +'</strong>/'+ slide_count);
};

var slider = $('#slideshow').bxSlider({
	auto: true,
	pager: false,
	onSliderLoad: function (){
		var slide_count = slider.getSlideCount();
		var slide_curr = slider.getCurrentSlide();
		insertCount(slide_curr,slide_count);
	},
	onSlideAfter: function (){
		var slide_count = slider.getSlideCount();
		var slide_curr = slider.getCurrentSlide();
		insertCount(slide_curr,slide_count);
	}
});

Here you can find a demo.


Updated code, and demo with the latest BxSlider version.
The old code with the 4.1.2 bxSlider version, throws an error if the “getSlideCount()” public method is called in a callback fuction.

$('#slide-counter').prepend('<strong class="current-index"></strong>/');

var slider = $('#slideshow').bxSlider({
	auto: true,
	onSliderLoad: function (currentIndex){
		$('#slide-counter .current-index').text(currentIndex + 1);
	},
	onSlideBefore: function ($slideElement, oldIndex, newIndex){
		$('#slide-counter .current-index').text(newIndex + 1);
	}
});

$('#slide-counter').append(slider.getSlideCount());

Updated demo
JQuery Cycle pager with leading zeros

Adding leading zeros to Cycle’s pager can sometimes make a big visual difference. Using the pagerAnchorBuilder this can be achieved very simple:

pagerAnchorBuilder: function(idx, slide) {
	if (idx < 10) {
		return '<li><a href="#">0' + (idx+1) + '</a></li>';
	} else {
		return '<li><a href="#">' + (idx+1) + '</a></li>';
	}

WordPress get posts by taxonomy terms

With get_posts() you can do a lot of things, like creating multiple posts loops, retrieve posts by all sorts of criteria, etc.

One of the interesting part comes when you want to create a posts loop with only the posts from certain taxonomy term/terms.

On the codex page of the get_posts function, we find an example, which tells us to rename the ‘category’ argument with our taxonomy name, and it’s value is one of taxonomy’s terms name; but they don’t say anything about multiple terms. Well, it seems like it works if you pass a comma separated string of terms, the question now is how you can get a comma separated string of terms, of the current post, in single-posttype.php.

The get_the_term_list() seems to be just perfect for the job. The problem with this is that it also returns html anchor tags with the terms link; this can be solved with the strip_tags() php function.

$terms = strip_tags( get_the_term_list( $post->ID, 'taxonomy-name', '', ',', '' ) );

$arg = array(
	'numberposts' => 4,
	'orderby' => 'rand',
	'post_type' => 'post-type-name',
	'taxonomy-name' => $terms,
	'post_status' => 'publish'
);
$related_posts = get_posts ( $arg );

This can be a nice way to get random related posts who share same taxonomy terms.

How to test a bipolar transistor

This post refers to how to test a bipolar junction transistor (BJT) with an ohmmeter.

A bipolar transistor has two PN junctions; a PN junction basically behaves as a simple diode. Bipolar transistors come in two types, NPN and PNP, based on how the base of the transistor is doped.

A simple method to see if the transistor is good ( presuming you have just an ohmmeter ), is to use the ohmmeter to test each of the two junctions.

Note: You can use any type of ohmmeter ( analogical or digital )

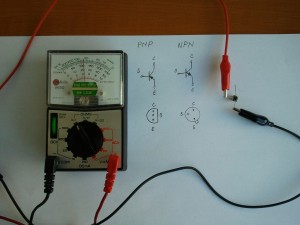
Set your ohmmeter on the X1 domain, and:

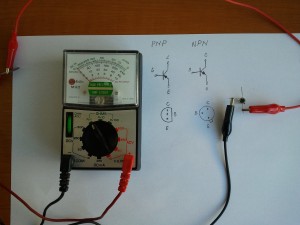
Step1: Connect the red probe to the base(B) of the transistor and the black probe to the emitter(E)

Now we test the PN junction between the base and emitter ( BE ).

Red probe to base and black to emitter.

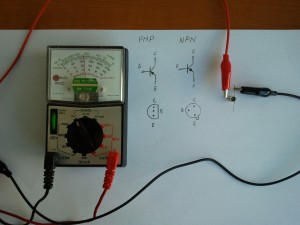
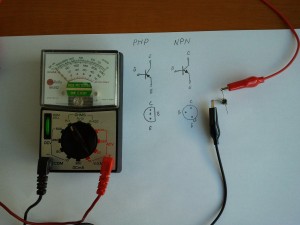
Step2: Connect the red probe to the base(B) of the transistor and the black probe to the collector(E)
Now we test the PN junction between the base and collector ( BC ).

Red probe to base black to collector.

If you get readings ( higher then 0Ω ) in both cases, then the junctions are good, and because the red probe was connected to the base, means that the transistor is NPN type. ( You should NOT get any readings ( Ω ) with the black probe connected to the base. )

Step3: If you didn’t get readings at Step1 and 2, then move the black probe to base(B), and repeat Step1 and 2

If you get readings, as in steps 1 and 2, but with the black probe connected to the base, and no readings at all with the red probe connected to the base, that means your transistor is also good, but is of PNP type.

Summary:

  • Red probe connected to base, and readings with the black probe connected to both emitter and collector ( one at the time ) => transistor is GOOD and is NPN.
  • Black probe connected to base, and readings with the red probe connected to both emitter and collector ( one at the time ) => transistor is GOOD and is PNP.
  • Both cases above, but no readings ( Ω )  or short-circuit ( 0Ω ), means the transistor is fried.

Change the default throbber in Drupal 7

‘Throbber’ in Drupal is the animated loader ( found at  /misc/throbber.gif ), used to indicate Ajax progress.

If you want to change it evenly across your theme, don’t even think to just replace the ‘/misc/throbber.gif’, instead save your .gif file in your drupal theme, and in your theme’s .css file override drupal’s default CSS rules which style the ‘throbber’. This default CSS can be found ( but not edited ) at ‘/modules/system/system.base.css’, and you just have to copy them to your css file, as shown below.

Keep in mind that ‘throbber.gif’ is in fact a sprite image, which contains two states ( one static, used for idle state, and one animated used for progress ).

Add these in your theme’s .css, and tweak them accordingly to your animated loader :

/* these apply to auto-completing form fields */
html.js input.form-autocomplete {
  background-image: url(path-to-your/loader.gif); /* tweak this according to your gif */
  background-position: 100% 0px; /* tweak this according to your gif */
  background-repeat: no-repeat;
}
html.js input.throbbing {
  background-position: 100% -20px; /* tweak this according to your gif */
}

/* these apply to all ajax progresses */
.ajax-progress {
  display: inline-block;
  *display: inline;
  *zoom: 1;
}
.ajax-progress .throbber {
  background: transparent url(path-to-your/loader.gif) no-repeat 0px 0px; /* tweak this according to your gif */
  float: left;
  height: 20px; /* tweak this according to your gif */
  width: 20px; /* tweak this according to your gif */
  margin: 2px;
}

ECC81 tube radio

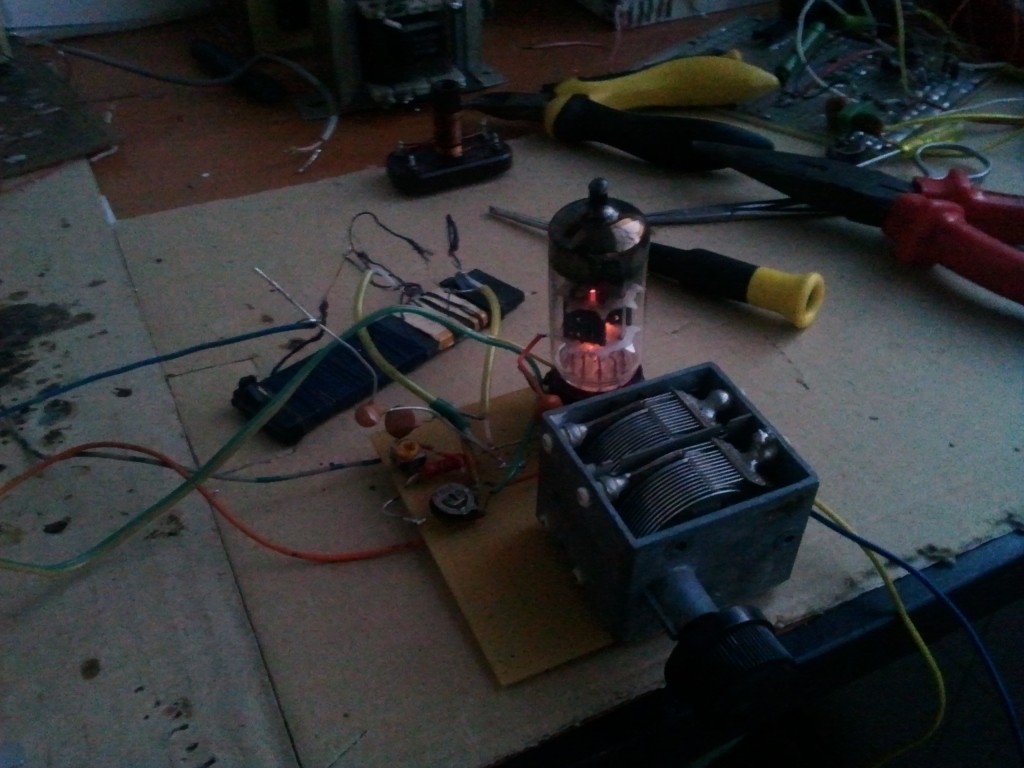
I’ve seen a lot of circuits with tubes at low voltage ( max 20V ), so I wanted to experiment with one too,… and what could be more fun to play with than a radio.

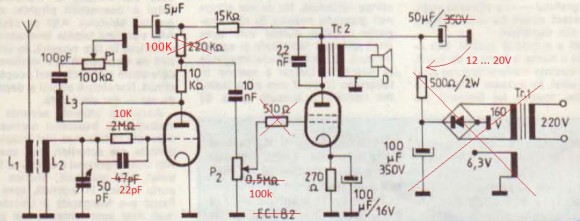
I started from a short-wave radio schematic with an ECL82, in which I replaced the ECL82 with a ECC81, which I knew could work at low voltage, and did a little tweaking with the resistors, and coils.

ecc81 radio schematic

L1 = 4 turns, L2 = ~40 turns, L3 = 4turns, in this order on a ferrite stick. ( the fun part is to play with these coils and the variable capacitor, until you hear something ).

Note, that all the values are not strict, tweak them as you see fit.

I’ve also had great results leaving aside L1, and connect the antenna by a 100pF capacitor directly in L2.

Have fun.

Custom select input

Using some jQuery and CSS you can make a cross-browser custom select (dropdown) box.

<div class="select-wrapper">
    <select>
        <option selected="selected" value="1">Option 1</option>
        <option value="2">Option 2</option>
        <option value="3">Option 3</option>
        <option value="4">Option 4</option>
        <option value="5">Option 5</option>
    </select>
</div>
.select-wrapper {
  position: relative;
  width: 215px;
  height: 30px;
  padding: 0 25px 0 0;
  margin: 0;
  border: 1px solid #0D5995;
  overflow: hidden;
  background: url(select-arrow.png) no-repeat right center transparent;
}

select {
  position: absolute;
  left: 0;
  top: 0;
  opacity : 0;
  width: 240px;
  height: 30px;
  padding: 5px 0;
  border: none;
  background: transparent !important;
  -webkit-appearance: none;
}

.select-wrapper span {
  display: block;
  width: 210px;
  height: 30px;
  line-height: 30px;
  padding: 0 0 0 5px;
}
$(document).ready(function() {
  $('select').after('<span>' + $('option:selected', this).text() + '</span>');
  
  $('select').click(function(event) {
    $(this).siblings('span').remove();
    $(this).after('<span>' + $('option:selected', this).text() + '</span>');
  });
})

See the demo.